Time for your first standalone Meta Ads campaign? The following checklist will take you step by step through the ad creation process from setting goals to optimizing.
1. DEFINE THE GOAL OF YOUR ADVERTISING IN META ADS
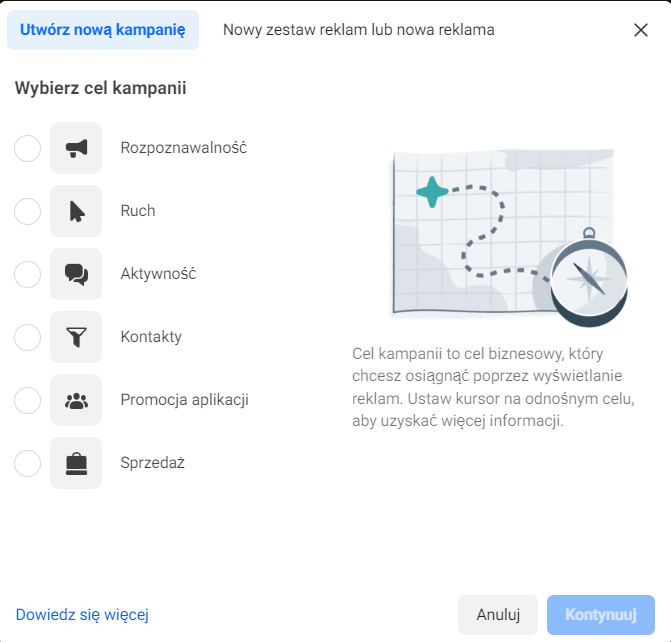
Facebook in a new view proposes 6 main advertising goals:

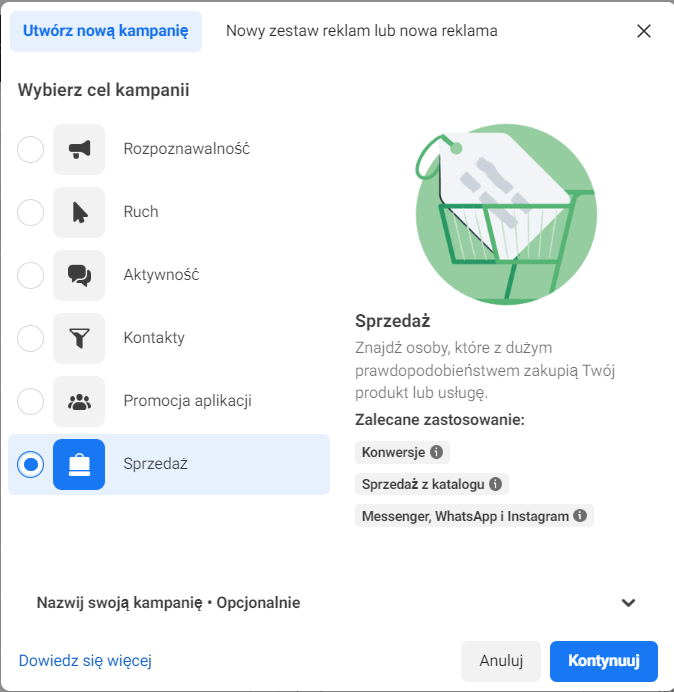
After clicking on a specific goal, a list of subgoals will appear. I'll show this using the "Sales" goal as an example:

As we can see, the “sales” goal is divided into:
- Conversions.
- Catalog sales.
- Messenger, WhatsApp and Instagram – i.e. sending messages to a company profile.
I encourage you to click through all the goals and see which one is best suited to your business goal. It’s also a good idea to correlate this decision with the budget you have. If your budget isn’t enough to set the “Conversions” goal (i.e. purchase on the site), then it might be worth shifting the budget to the “Traffic” goal.
Let's remember that the most important thing is to define what we want to achieve with a given campaign or group of campaigns.
2. SET TARGET GROUP IN META ADS
Our next step will be to set the target group, which can be found in Meta Ads under the name "Ad Set". Depending on the choice of advertising objective, this tab will be different, but the following points remain the same for each objective:
- ad set name – name it so that we know what target group it contains,
- optimisation for ad display – e.g. for the “Traffic” goal, these will be link clicks or landing page views,
- we can also set maximum cost per result,
- daily or total budget – if we want to display the ad on specific days and/or hours, let’s choose the total budget,
- advertising placement,
- target group – more about her below.
When setting up an audience in Meta Ads we have several options, depending on the data we can give to the algorithm:
- interests – the easiest way to create a group. It is worth bearing in mind that Meta gradually removes some interests and rather, as an advertising system, is directed towards creating general groups. But if your pixel on the website does not yet have enough data to create a group of custom recipients, then interests will be fine at the beginning
- custom audiences – this is where you can go wild. If you have had an active Meta pixel for at least a few weeks, it is worth creating custom groups based on it. These could be, for example: people who spent a certain amount of time on your site, people who were on specific subpages, etc.
- another option is to create custom groups based on, for example, people who have watched our videos, viewed ads, or are on our mailing list.
- all these groups are perfect for remarketing
- groups of similar recipients. However, if we want to direct the campaign to people who do not yet know our brand, we can take each group from the previous point and create a group of similar recipients from it.
Let's not forget about exclusions. If we want to target a group of people similar to those who were on our www, then let's exclude people who were on www :) etc.
In the location selection option, we can include or exclude a given geographic range. We can enter a location in the search engine or mark it on the map with a pin.
3. CREATE CREATIVE ADVERTISEMENTS IN META ADS
Think about what phrases/words people from your target group use and… use them in your ads. If you don't have interviews with your group, use other sources:
- opinions on Google
- ask your sales department how your customers communicate with you, what they ask about, what their biggest pain point or need is.
Without understanding your target group, you won't create a good creative.
Once you have more insights, create a creative that communicates your main goal in a simple, clear way.
The message must be clear:
- We will make you a warehouse that works. Arrange a presentation of the production management system.
- quote + information "Gallup Talents in Polish Organizations – download e-book".
- Follow us for more knowledge on how to care for your spine.
- We deliver orders from 10:00. Bagels, Wraps, Salads to your home or work.
4. TEST YOUR ADVERTISEMENTS
You can set up A/B tests that will allow you to choose the most effective version of your ad.
5. MONITOR, ANALYZE AND OPTIMIZE YOUR META ADS
Once your ads are activated, it’s time to move on to the important step of analysis and monitoring.
Monitoring comes down to checking whether the budget is being collected correctly, whether invoices are being issued, whether the account has reached its payment limit, and whether there are any errors in the ads.
Analyzing results is also related to optimization. If you see that your ads have a low link CTR, check if the target group is appropriate, if the creative is well-chosen. Make a decision and make ONE change. If you make several changes at once, you won't know which variable turned out to be key.
How often should you check your ads? Every day for monitoring. Every 2-3 days for optimization.
SUMMARY
Working on Meta Ads campaigns starts with a well-thought-out strategy. If you don’t have one, I encourage you to read the articles from the strategy series:
Why is it worth ensuring consistent brand communication?
Marketing personas: why would you need them?
Mission and Vision, who needs it?
- Written by: Ola Dzwierzyńska
- Posted on: 17 Jan 2023

